
Categories
Control panel overview
In this article we are going to discuss the basics of the control panel, the control panel can be accessed through the following link:
https://control.mijnhostingpartner.nl
When you purchase a package or service from us you will receive the necessary login details for the control panel at your email address. With these details you can log in to the link above.
If you have forgotten or lost your login details, please contact our helpdesk to have them sent to you again.
You are now logged in, the first thing you see is the following screen:
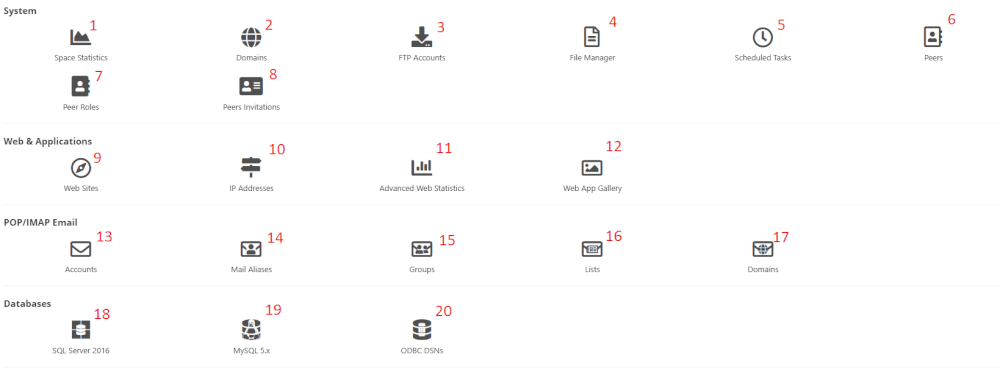
In this screen you can see all the settings of your services or products, the example above is of a total package. The total package has all the functions needed for a website and email. On the right side of the screen you can see the information, here you can also change it.
We will go down the list with all the options:
- At Space statistics you can see the statistics of your hosting space, for example the number of domains on this package or your used disk space. There is also the option to make a backup of your total hosting space. We always recommend to do this when your site is finished.
- Domains shows your domains, here you can also set the DNS settings. You can also add a subdomain here.
- Under FTP accounts you can create/restore an FTP account, an ftp account is used to access your files through an FTP client like FileZilla.
- File manager is used to view your files on your hosting space, here you can also set the write permissions on your files. However, for heavier work we recommend to use FileZilla. This works faster.
- Scheduled Tasks. This is a feature that can be used when you want to automate a task. With this function you can, for example, automatically write a backup of your website every Wednesday.
- Under this heading you can create sub accounts with your own rights, for example for your web administrator.
- Here you can set specific rights that you can then link to users. See it as a templateHere you can see
- the mail addresses of the people for whom you have created a peer account.
- Under websites you can see the settings of your web site. Here you can set website pointers or create a redirect.
- Here you will find the IP address of your hosting space. If you have the standard package, no IP address will be displayed here. These are shared IP addresses, or 1 IP are multiple websites/clients. If you have the add-on own IP then you get your own.
- Here you can create a statistics site, you can compare this with a service such as Google Analytics. This is currently not used and we are working on an alternative.
- In the Web app gallery you can install programs like WordPress or Joomla in a few actions.
- Here you can create and manage mail accounts and other settings.
- Mail Aliases, here mail addresses can be created as aliases. This is a setting for duplicating / cooperating accounts.
- Mail Groups. can be set up in the following way. These are collections of mail accounts.
- Mail Lists, the mailing lists can be set hereMail
- Domains. here are the mail domains stored also you can activate DKIM here. When this is removed you will lose all your mail, so be careful with this!
- MsSQL databases. With a standard package without add-ons you have no rights to a MS-SQL database. Here it is only possible to create a MySQL database. You can create this under MySQL 5.xMySQL
- databases, the standard databases for websites created in WordPress.
- This is a link that you can use for Microsoft Access databases.