 04-07-2022
How to set up a BIMI for your business mail
A relatively new addition to Gmail, and now also in the next version for IOS and Mac, are the "Brand Indicators for Message Identification", or in short a displayed logo with verification on your email messages. This feature is not yet supported by all email clients, so it will show up for a large portion of your customers, but not for some. Let's take a look at how you can create a BIMI image and display it in your email.
What is BIMI and what can you do with it?
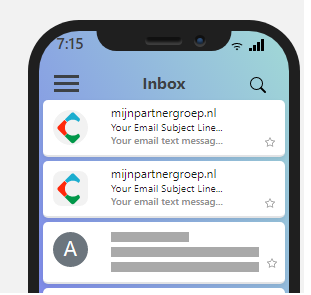
A BIMI makes your email address, and therefore email messages, appear more reliably in the inbox of someone with the logo you specify. If you don't use this option, the user will see only the first letter of the email address or domain name. And it does not provide any additional benefit. With a properly installed BIMI, your messages can stand out better in the inbox and therefore will be opened and trusted more quickly.
In concrete terms, this now looks like this:
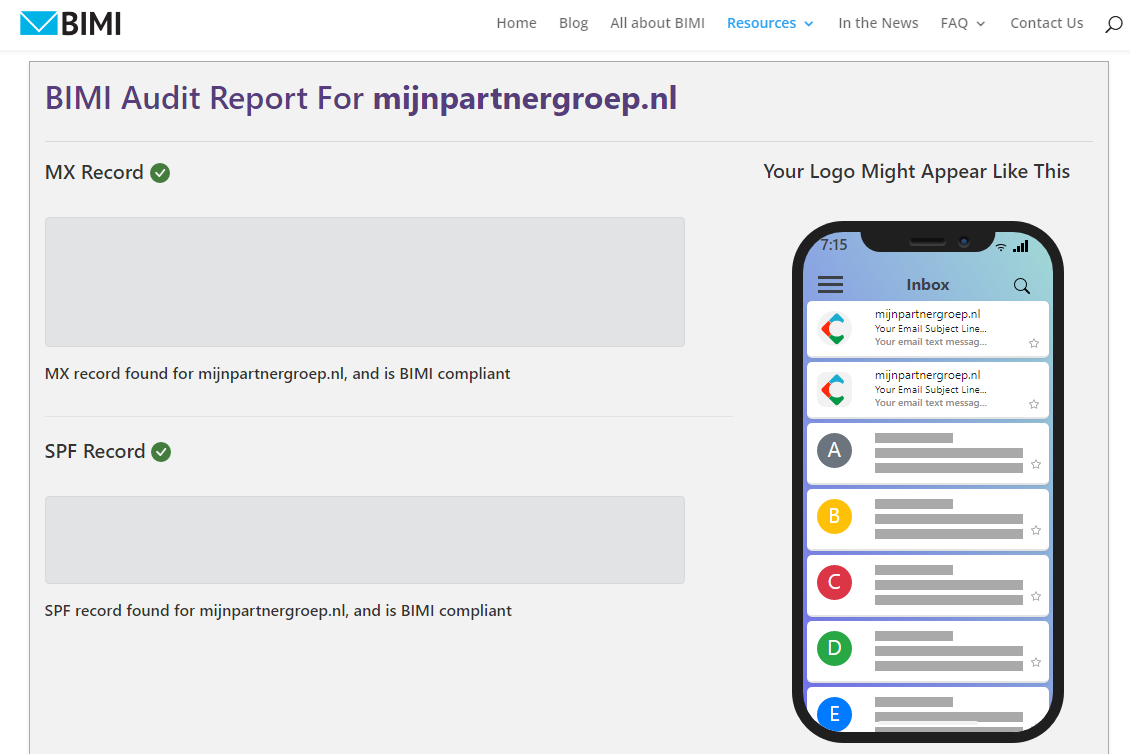
Check and create the DNS records
The first step in creating the BIMI image is to check that all the necessary settings are in place. With the online tool, you can easily check this using a browser of your choice.
https://bimigroup.org/bimi-generator/
Then enter your domain name and run the check. You will see a list of conditions and settings that you need to set up. Your mail servers must be in order, by default these are our mx servers, 1 through 5. The SPF record must be in place and filled out completely. And your DMARC certificate should not only be enabled, but unverified messages should be quarantined or rejected. So adjust this in your records if necessary.
Create SVG Tiny PS image
The logo itself needs to be created. This is a special format that is not the standard SVG format. To create it, you can use a tool provided by the developers of BIMI itself. This can be done with a local GUI tool or with an extension for Photoshop. You can also do it with an online tool in your browser. The default SVG format can be used, but this may cause problems with incompatibilities. It is therefore advisable to convert it to SVG Tiny 1.2 format. This can be done with the following online tool:
https://easydmarc.com/tools/bimi-logo-converter
Read the other tips and instructions for the exact recommended dimensions and data. In short, the image must be square and have the new format. For example, 400 by 400 pixels can be used.
Upload the SVG image to your hosting space.
Once you have your new SVG logo created and in your possession, you can follow the steps below to upload it to your hosting space and use it in the email.
Make sure that your website and domain name require an SSL certificate, install or order it now if you haven't already. The image for it can be uploaded to any folder. You may want to create a separate folder in your media folder to keep them separate. Then all you have to do is upload the image to the desired location via FTP. Then try to access that location via the browser. You can then use that URL in the DNS record. This is the last part that needs to be applied in your hosting space for BIMI.
The DNS record you need to add as the last step can be done through the client panel. Just make a note of the location of the image to add it. A default DNS record for BIMI may look like this:
"v=BIMI1; l=https://mijndemopartner.nl/partners-logos/-bimi.svg; a=;".
After that, as always, consider the DNS update, which can always take a while before a new entry is visible. For a .nl domain, this can take 3 to 6 hours. For a .com domain, this can easily be 24 hours.
Verification via the online tool
Finally, after you have added and created everything, you can test your BIMI image in the post. This feature is only available in a select number of applications. Gmail and IOS Mail are two of them. However, these are also the mail applications most used by many people. So, a large part is already done by these two parties.
With the online tool, you can check if it is active, and you can also see an example of how this looks to the customer.
And those are all the steps you need to take to activate it. For all the tips, please follow our blog! We give tips and tricks of this kind up to 4 times a week.