Also check out below articles
 28-02-2026
Why is my WordPress website slow?
WordPress is unfortunately not known for being the fastest way to run a website19-05-2025The risks of expired Domains
A domain name is more than just an address on the Internet - it is often the13-02-2026ChatGPT begins running ads
What every user had already expected is now being introduced in the ChatGPT14-11-2025Updating a database to a newer version
In many situations, it is advisable to regularly carry out major maintenance work on a website. One such task that cannot be carried out automatically is updating a database version to a newer version. Major updates, for example from MySQL 5 to MySQL 8, or simply switching from MySQL to MariaDB. These can only be carried out manually and require the necessary attention. Using the latest versions will make your websites better in many cases, and you may notice a speed difference on your website for almost all operations.
So in this blog post, let's take a look at how you can easily and safely update your database to a newer version!
Preparation is half the battle
Whenever you update your database, preparation is the biggest part of the job and the reason why things can go wrong. Pay attention to the following things before you change databases and configuration settings:
Make sure you have a local backup of your database.
A local backup before you start this work is not a piece of advice but a must, export your database to a safe place. For example, by exporting it directly via PHPmyAdmin, or by using a local tool such as MySQL Workbench, SQLyog or for MS SQL - SQL Server Management Studio (SSMS).
Make sure you know where you are connecting to and with what data
Any website with a database will in many cases connect to the database in a configuration file. If you change the host, name, user and password. Then you have to enter these details again. Here too, it is therefore advisable to make a local backup of this file. For WordPress, for example, this is wp-config.php. And only then adapt it to the new data. You can also enter the exact data of the new and old environment in Notepad, for example. This way you can look them up at any time.
Create and import the desired database data
Once you have completed the preparation and backup of your current database and data, you can continue with the creation of your new database and its data. You can then log in to this database with the new data and import your database.
This may sound difficult, but in 99% of cases it is just two clicks of a button. The rest is done for you by PHPmyAdmin. Only sometimes do you get an error message that you have to fix first. Fortunately, this is not the case in most cases. If you receive an error message relating to files that are too large, you can also use a local tool such as SQLyog instead of PHPmyAdmin. These can often handle larger files better. If your database is larger than 50 MB, it is advisable to have such a local tool ready as a plan B.
MS SQL can be imported via the control panel by navigating to the database after it has been created on the new server and opening the Maintenance tools section. Here you will see the option to import a bin file. Nevertheless, check whether your SQL version is suitable for such an import in later versions. And update where necessary.
Change your configuration files and test them
Once you have updated your database to the latest version, you can change the data in your configuration files and publish them on your hosting space. The change will be live immediately and you will see results straight away. Of course, this is difficult to verify, because it either works or it doesn't. But in most content management systems, you can then see whether the change has been made.
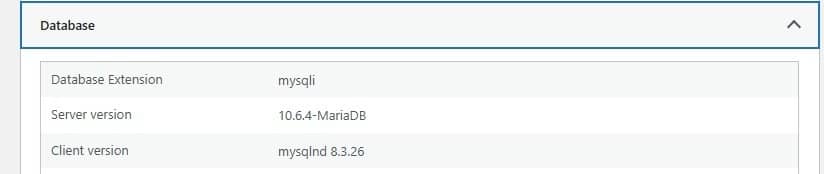
In WordPress, for example, you can see this in the website status tools, which have a special tab with the database data.
These are all the steps required to update your database to a newer version and therefore it's mainly about speed and stability. This does not need to be done every month, but rather once a year. By always using the latest technology in your hosting package , you ensure that your website can continue to grow without hitting technical limits. So check this regularly. And keep an eye on our blog posts and announcements for more information!